The store will not work correctly in the case when cookies are disabled.
We collect user information to provide a better user experience and protect the security of our website. By continuing to use our website, you acknowledge the use of cookies.
The General Electric WR55X34171 Refrigerator Profile Display Board controls and shows various functions in the refrigerators and advanced control board that is used to manage the inputs from the user and control parameters like temperature, energy modes, and diagnostics. It operates through the reception of signals from the sensors and the conversion of these signals into the right commands to cool the system and make it efficient. The display is backlit it is real-time, and can easily monitor the adjustments being made on the system.
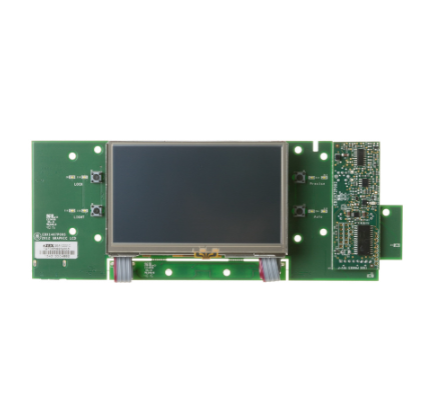
As part of the refrigerator’s profile control assembly, the GENERAL ELECTRIC WR55X34171 Refrigerator Profile Display Board combines a central display panel with board-mounted electronic and user-input sections. This assembly forms the user-facing portion of the refrigerator’s electronic control interface.
Profile Display Circuitry:
Circuit board sections positioned around the display contain the electronic circuitry associated with the profile display assembly. Ribbon-cable connections beneath the display provide electrical connections between the display assembly and its associated electronic components.
Profile Control Inputs
User-input buttons are positioned on both sides of the display panel as part of the board assembly. These controls provide the physical input points through which users interact with the designated functions available through the refrigerator’s profile control interface.
Replacement Guidelines:
Replacement may be appropriate when the GENERAL ELECTRIC WR55X34171 Refrigerator Profile Display Board is damaged or no longer performs its intended display or control-interface functions.
Common Failure Symptoms:
Blank or missing display information.
Portions of the display not appearing correctly.
Incomplete or abnormal display information.
Intermittent display operation.
Unresponsive display-interface functions.
Equipment Compatibility:
The General Electric WR55X34171 Refrigerator Profile Display Board should be matched to the applicable GE refrigerator by verifying the complete refrigerator model number, display configuration, and manufacturer part number WR55X34171 against the relevant GE parts documentation before purchase.
What maintenance is required for the General Electric WR55X34171 Profile Display Board?
Wipe the display gently with a soft, damp cloth to remove fingerprints and smudges without allowing liquid to enter the housing. Avoid harsh solvents that could degrade graphics or seals. Inspect wiring harnesses for secure contact during routine service. Disconnect power before accessing any electronics.
What are common issues with the General Electric WR55X34171 Profile Display Board?
Display fails to show information correctly.
Buttons unresponsive.
Error codes appear unexpectedly.
Settings do not save properly.
What is a refrigerator Profile Display Board used for?
A Profile Display Board supports the refrigerator’s display interface and designated user-input functions.
How does a Profile Display Board support user interaction with a refrigerator?
It provides the display interface and button-based input points used for designated refrigerator functions.
What role do the buttons on a refrigerator Profile Display Board serve?
The buttons provide user-input points for designated refrigerator functions.
Why might only part of a refrigerator display become unreadable?
A display problem can affect specific portions of the display, resulting in missing or incomplete sections.
How can WR55X34171 be matched when replacing a Profile Display Board?
Match the WR55X34171 part number with the complete refrigerator model number and verify the board designation in applicable parts documentation before ordering.
Installation Steps
Step1: Disconnect the refrigerator from power.
Step2: Remove the dispenser control panel or display housing cover.
Step3: Disconnect ribbon cables and wiring from the existing display board.
Step4: Install the new display board and reconnect all connectors securely.
Step5: Reassemble the panel and restore power to verify display function.