Special Price
$149.19
Regular Price
$198.03
In stock
Available Quantity:
81
SKU
WR17X23191
The 
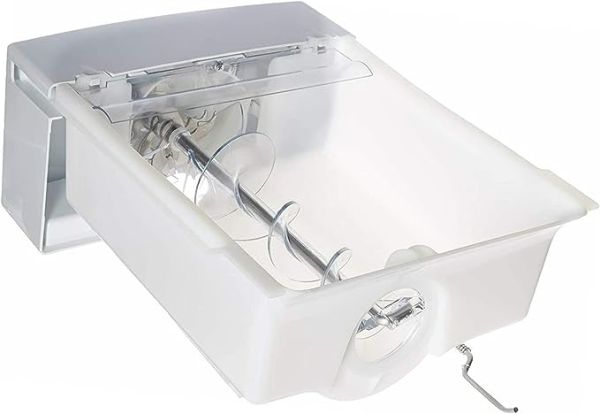
General Electric WR17X23191 Refrigerator Ice Bucket & Auger Assembly is designed to provide easy dispensing of ice through storage and release of ice cubes. The auger moves the ice from the bucket to the dispenser without the ice getting stuck. This part is important to ensure that ice is properly distributed and easily accessible for frequent use. It fits different refrigerator models and is useful in ensuring the fridge’s functions efficiency by replacing damaged parts.
Manufacturer
✓ This Product Replaces:
WR17X10768, WR17X11429, WR17X11307
This Part Fits the Following Models (937)
GE PSA22SIMCFBS Refrigerator
GE PSA22SIMDFBS Refrigerator
GE PSA22SIPAFBS Refrigerator
GE PSA22SIPAFSS Refrigerator
GE PSA22SIPCFBS Refrigerator
GE PSA22SIPCFSS Refrigerator
GE PSA22SIPDFBS Refrigerator
GE PSA22SIPDFSS Refrigerator
GE PSA22SIPHFBS Refrigerator
GE PSA22SIRBFSS Refrigerator
GE PSA22SIREFSS Refrigerator
GE PSA22MIPCFWW Refrigerator
GE PSA22MIPDFBB Refrigerator
GE PSA22MIPDFWW Refrigerator
GE PSA22MIPHFBB Refrigerator
Showing 1-15
of 937
| Manufacturer Name: GENERAL ELECTRIC Product Number: WR17X23191 OEM Part Number: WR17X23191 Product Description: Bucket & Auger Asm |
Choose the best Home Appliance parts and supplies from HnKParts!
Same Day Shipping
Best Quality And Best Price
Wide Range of Inventory
Best Customer Service
Have More Questions or Need Help to Place The Order?
Reach us at (866)723-0907 or [email protected]
Write Your Own Review
Customer Questions
Installation Steps
Step 1: The refrigerator is disconnected from the electrical outlet and shifted away from the wall to access the rear of the freezer compartment.
Step 2: The screws that hold the rear freezer panel are taken out and the panel is detached to reach the ice maker.
Step 3: The electrical connections from the back of the ice maker are unplugged.
Step 4: The mounting screws found on the sides of the ice maker are removed.
Step 5: The ice maker is carefully lifted out of the freezer and set on a sturdy work surface.
Step 6: The screws securing the ice bucket are taken off.
Step 7: The old ice bucket and auger assembly are extracted.
Step 8: The new ice bucket and auger assembly are aligned with the slots in the ice maker housing.
Step 9: The new ice bucket and auger assembly are fastened using the screws that were removed from the previous unit.
Step 10: The wiring and screws are reconnected to secure the ice maker in its position.
Step 11: The rear freezer panel is reinstalled and fastened with the screws.
Step 12: The refrigerator is pushed back into its original position and reconnected to the electrical outlet.
Step 13: The refrigerator is powered on and the ice maker is checked to confirm it operates correctly.
Please note that these instructions are served as general guidance and should always be followed in conjunction with the manufacturer's manual, if available.
