The store will not work correctly in the case when cookies are disabled.
We collect user information to provide a better user experience and protect the security of our website. By continuing to use our website, you acknowledge the use of cookies.
Observance of Independence day July 4th we are closed [No shipping's and deliveries ] on 07/03/2026, Orders received after 3.00pm CST on 07/02/2026 will be shipping out on Monday 07/06/2026
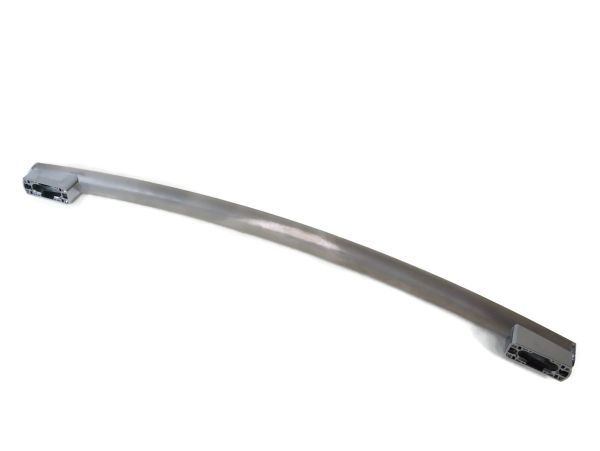
The General Electric WR12X34310 Refrigerator Freezer Door Handle is designed to give a firm and fashionable handle to open and close the doors of the refrigerator and freezer and simple to install on the door and firmly fixed to the door to provide proper support for regular use and increase the beauty of the appliance while at the same time making it more durable and less susceptible to damage. This handle enhances convenience, retains the utility of the unit, and fits in with contemporary kitchen aesthetics with its shiny finish.
The GE Refrigerator WR12X34310 Ss Freezer Door Handle is a high-end complement to any kitchen, flawlessly combining practicality and stylish style. This handle improves the overall appearance of your refrigerator while also offering a dependable and ergonomic alternative for accessing the freezer section. The WR12X34310 handle is made of high-quality stainless steel, which not only emanates modern elegance but also provides long-term durability. Its sleek and glossy surface is not only smudge and fingerprint-resistant, making cleaning a snap, but it also adds a sense of modern flair to your fridge. The handle's precisely designed ergonomic form guarantees a comfortable grip, allowing you to simply open and close the freezer door.
Key Features of the GE Refrigerator WR12X34310 Ss Freezer Door Handle
The SS (Stainless Steel) Freezer Door Handle is most likely intended to be long-lasting, corrosion-resistant, and visually appealing.
Users can open and seal refrigerator doors with ease thanks to the comfortable and ergonomic handles.
The handle design should give a solid grip for easy and convenient use.
What maintenance is required for the General Electric WR12X34310 Freezer Door Handle?
Regularly wipe the handle with a soft damp cloth and mild detergent to remove grease and fingerprints. Avoid abrasive pads that may scratch the stainless steel finish. Periodically inspect and tighten the mounting screws to prevent loosening. Disconnect power before adjusting hardware to ensure safe handling during maintenance.
What are common issues with the General Electric WR12X34310 Freezer Door Handle?
Handle loosens after repeated use.
Mounting points shift during pulling.
Handle rattles when the door closes.
Surface shows heavy smudging.
Installation Steps
Step 1: It should be confirmed that the refrigerator is disconnected from the power source and that the unit is turned off.
Step 2: The freezer door should be opened and all food items, shelves, and ice storage bins should be taken out to reach the freezer handle.
Step 3: The screws that secure the freezer handle to the door frame should be detached.
Step 4: The old GE WR12X34310 SS Freezer Door Handle should be taken out and set aside.
Step 5: The new handle should be positioned into the connection holes of the freezer.
Step 6: The handle should be fastened to the refrigerator using the screws that were taken from the old handle.
Step 7: The area surrounding the newly installed handle should be cleaned and it should be verified that the screws are tightened securely.
Step 8: Any food items, shelves, and ice storage bins should be reinserted.
Step 9: The power cord should be reconnected to the wall outlet.
Step 10: The functionality of the newly installed handle should be checked to ensure it is securely attached and operates correctly.
Please remember, these instructions are intended for general advice and should always be used alongside the manufacturer's manual, if it is available.