The store will not work correctly in the case when cookies are disabled.
We collect user information to provide a better user experience and protect the security of our website. By continuing to use our website, you acknowledge the use of cookies.
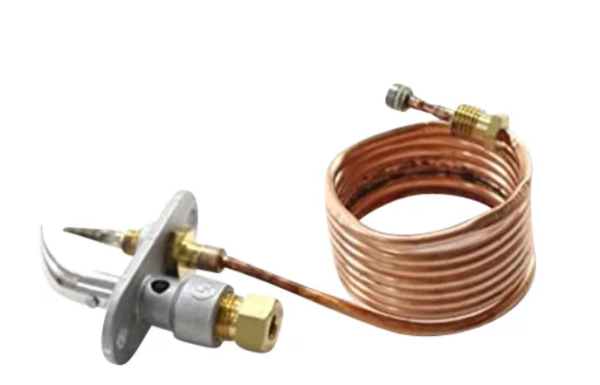
The Whirlpool WP7505P327-60 Burner Pilot RV is an equivalent part intended for Whirlpool RV gas ranges. It is a tiny but significant part that ignites the primary burner on your cooktop. When you turn the knob on your RV stove, the gas control valve opens and propane gas flows to the burner head. However, the gas will not ignite by its. This is where the pilot light comes in. The WP7505P327-60 pilot burner ignites the main burner with a continuous flame as soon as gas flows. This guarantees a quick and consistent ignition every time you wish to cook.This replacement pilot is compatible with a wide selection of Whirlpool RV gas range models, making it an adaptable choice for keeping your RV kitchen operational.
Step 1: The gas supply to the burner assembly in the RV should be shut off.
Step 2: Your Phillips screwdriver should be employed to extract the screws securing the access panel that shields the RV's burner assembly.
Step 3: The access panel should be gently taken off and the pilot light assembly should be identified.
Step 4: A pair of pliers should be utilized to detach the gas line from the existing pilot light assembly.
Step 5: The gas line should be attached to the new pilot light assembly.
Step 6: The new pilot light assembly should be fastened in position using the screws.
Step 7: The access panel should be reinstalled and the gas supply should be restored.
Step 8: The burner knob should be rotated to “pilot” and pressed down firmly while a flame is directed toward the pilot opening. The knob should be continued to be pressed and the flame maintained until the click indicating that the pilot has ignited is heard.
Step 9: The burner knob should be adjusted to “low,” and the RV top burner should now function properly.
Please remember, these instructions serve as general guidance and should always be utilized alongside the manufacturer's manual, if one is available.