The store will not work correctly in the case when cookies are disabled.
We collect user information to provide a better user experience and protect the security of our website. By continuing to use our website, you acknowledge the use of cookies.
Observance of Independence day July 4th we are closed [No shipping's and deliveries ] on 07/03/2026, Orders received after 3.00pm CST on 07/02/2026 will be shipping out on Monday 07/06/2026
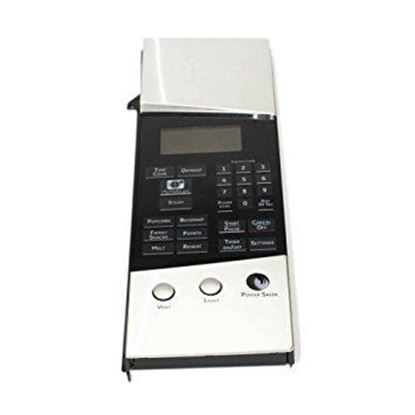
The General Electric WB07X11360 Microwave Control Panel Sub Assembly regulates all the operational commands and visual feedback to the appliance. This part is the interface to choose cooking functions, times, and start cycles and transforms these inputs into signals to control the magnetron, turntable motor and other working parts. It is integrated on the front outside of the microwave oven to ensure accurate signal processing that provides correct programmed cooking activities.
What maintenance is required for the General Electric WB07X11360 Control Panel Assembly?
Inspect buttons, knobs, and display for proper operation. Ensure electrical connections are tight and free from corrosion. Wipe away grease and food residue. Confirm that control inputs reliably trigger burners and oven functions.
What are common issues with the General Electric WB07X11360 Control Panel Assembly?
Erratic temperature readings.
Oven cycles stopping unexpectedly.
Buttons sticking or misregistering commands.
Oven lights not responding via panel.
Installation Steps
Step1: Shut off the power supply to the range.
Step2: Remove screws securing the existing control panel.
Step3: Carefully pull the panel forward and disconnect the wiring.
Step4: Attach connectors to the new control panel assembly.
Step5: Position it correctly and fasten with screws.
Step6: Restore power and confirm all controls respond properly.