Special Price
$57.77
Regular Price
$97.19
In stock
Available Quantity:
238
SKU
W11170612
The 
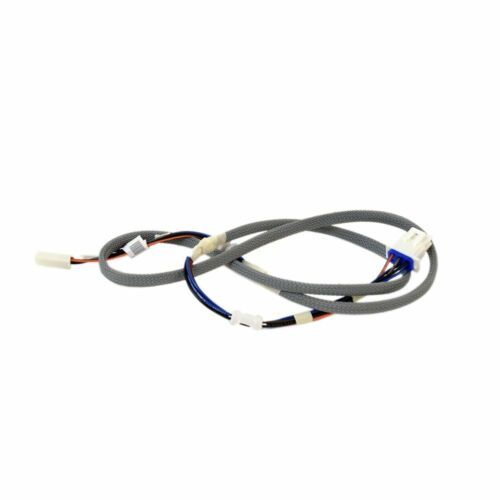
Whirlpool W11170612 Refrigerator Pantry Drawer Wire Harness, that allows an electrical connection to the temperature control system of the pantry drawer. It works by sending power and signals between the refrigerator’s control board and the pantry drawer so that the temperature can be adjusted precisely to preserve food. It provides durability and compatibility so that the cooling performance is maintained, to avoid temperature fluctuations that could damage food freshness, with the efficient operation of the appliance improving the longevity of the internal components.
Wire,
Manufacturer
✓ This Product Replaces:
W10512203
This Part Fits the Following Models (58)
Maytag MFX2876DRM02 Bottom-Mount Refrigerator
Maytag MFX2876DRM01 Bottom-Mount Refrigerator
Maytag MFX2876DRM00 Bottom-Mount Refrigerator
Maytag MFX2876DRH02 Bottom-Mount Refrigerator
Maytag MFX2876DRE01 Bottom-Mount Refrigerator
Maytag MFX2876DRH01 Bottom-Mount Refrigerator
Maytag MFX2876DRH00 Bottom-Mount Refrigerator
Maytag MFX2876DRE02 Refrigerator
Maytag MFX2676FRZ00 Bottom-Mount Refrigerator
Whirlpool WRX986SIHV00 Refrigerator
Whirlpool WRX986SIHV03 Refrigerator
Whirlpool WRV996FDEH01 Refrigerator
Whirlpool WRV996FDEM01 Refrigerator
Whirlpool WRV996FDEE02 Refrigerator
Whirlpool WRV976FDEM01 Refrigerator
Showing 1-15
of 58
| Manufacturer Name: WHIRLPOOL Product Number: W11170612 OEM Part Number: W11170612 Product Description: Harns-Wire |
Choose the best Home Appliance parts and supplies from HnKParts!
Same Day Shipping
Best Quality And Best Price
Wide Range of Inventory
Best Customer Service
Have More Questions or Need Help to Place The Order?
Reach us at (866)723-0907 or [email protected]
Write Your Own Review
Customer Questions
Installation Steps
Step1: Disconnect refrigerator power before starting.
Step2: Open the pantry drawer section and remove necessary covers.
Step3: Locate and unplug the damaged wire harness.
Step4: Route the new harness along the same path.
Step5: Connect all terminals firmly and correctly.
Step6: Reassemble components, restore power, and verify proper operation.
