The store will not work correctly in the case when cookies are disabled.
We collect user information to provide a better user experience and protect the security of our website. By continuing to use our website, you acknowledge the use of cookies.
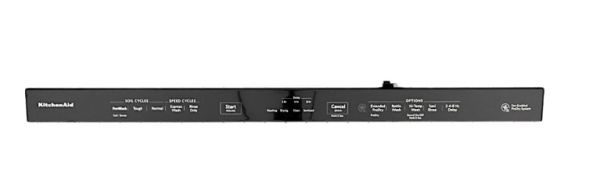
The Whirlpool W11162732 Dishwasher Console is a direct connection to the main system, allowing users to set wash cycles, start/stop, and other operational functional options, it signals the internal components of the dishwashing appliances to select the proper cycle for efficient cleaning selected by the user. Its durable design provides long-lasting performance with its smooth operation, with user controls adding to the dishwashing experience with precise cycle selection, convenience guided by pre-set options, and energy usage by saving time and resources.
What maintenance is required for the Whirlpool W11162732 Console?
Wipe the console surface regularly to remove residue or moisture. Test buttons and touch controls to confirm proper registration. Ensure indicators respond correctly during cycles and verify program selections activate immediately without lag or miscommunication.
What are common issues with the Whirlpool W11162732 Console?
Buttons not responding.
Program selection ignored.
Cycle not starting after command.
Indicators failing to update.
Installation Steps
Step1: Turn off power at the circuit breaker to ensure safety.
Step2: Open the dishwasher door and remove the old console panel carefully.
Step3: Disconnect any wiring harnesses, noting their positions.
Step4: Position the new console panel and reconnect all wiring securely.
Step5: Fasten the console with screws or clips.
Step6: Close the door, restore power, and test all controls to ensure proper operation.