The store will not work correctly in the case when cookies are disabled.
We collect user information to provide a better user experience and protect the security of our website. By continuing to use our website, you acknowledge the use of cookies.
Observance of Independence day July 4th we are closed [No shipping's and deliveries ] on 07/03/2026, Orders received after 3.00pm CST on 07/02/2026 will be shipping out on Monday 07/06/2026
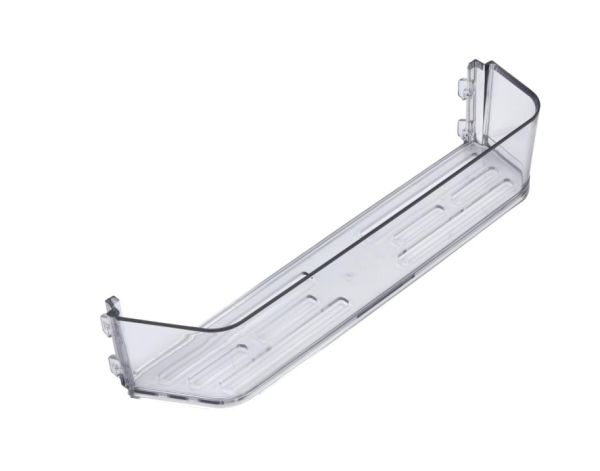
The Whirlpool W10887799 Refrigerator Door Shelf Bin/Trivet provides extra storage for bottles, jars, and condiments, keeping items organized. It securely attaches to the refrigerator door, offering a stable space for frequently used items. Made from durable plastic, it holds various-sized containers while maintaining easy accessibility. This bin is used to maximize storage capacity, reduce clutter, and improve kitchen efficiency. Its sturdy design ensures long-lasting use, and the transparent material allows quick identification of stored contents, enhancing convenience.
Step 1: The appliance must be disconnected from the electrical outlet and the water supply must be turned off.
Step 2: The dishwasher door must be opened and the trivet must be identified. A locking mechanism may be featured by certain models that must be engaged to open the door.
Step 3: The top rack of the dishwasher must be taken out. Access to the screws securing the trivet will be allowed by this action.
Step 4: The screws must be detached and the trivet must be taken off. If the screws are proved challenging to unscrew, a wrench or pliers must be employed to facilitate their removal.
Step 5: The area surrounding the trivet must be wiped with a damp cloth. Any food residues or accumulated deposits from the surface must be eliminated.
Step 6: The new trivet must be positioned in the same orientation as the old one. The holes must be aligned precisely with the existing ones.
Step 7: The new trivet must be fastened by tightening the screws using a screwdriver.
Step 8: The top rack must be reinserted into the dishwasher.
Step 9: The electrical and water connections must be re-established.
Step 10: The new trivet must be verified by running a cycle with a few dishes inside.
Your Whirlpool W10887799 Trivet has now been successfully replaced!
Please remember, these instructions are served as general guidance and should always complement the manufacturer's manual, when available.