
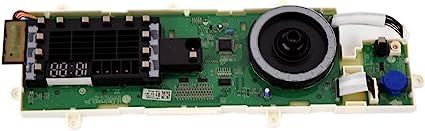
LG EBR81634405 Washer Power Control Board PCB Assembly

Special Price $244.00 Regular Price $342.56
In stock
Available Quantity:   31
SKU
EBR81634405
✓ This Product Replaces: EBR81634403

Product Description

The LG EBR81634405 Washer Power Control Board Assembly is placed inside washing machines to manage and coordinate all functions. It controls the operation of the machine and handles the cycles, distributes power and ensures all wash, rinse and spin actions are smooth. The control board reads signals sent by sensors and then directs the motor, water inlet valves and drain pump accordingly.
Manufacturer

https://www.hnkparts.com/media/catalog/product/e/b/ebr81634405_lge_hnkparts.png

This Part Fits the Following Models (1)

Manufacturer Name: LGE
Product Number: EBR81634405
OEM Part Number: EBR81634405
Product Description: Pcb Assy-Display

Choose the best Home Appliance parts and supplies from HnKParts!

  • Same Day Shipping

  • Best Quality And Best Price

  • Wide Range of Inventory

  • Best Customer Service

Have More Questions or Need Help to Place The Order?
Reach us at (866)723-0907 or [email protected]

Write Your Own Review
You're reviewing:LG EBR81634405 Washer Power Control Board PCB Assembly
Your Rating
Customer Questions
What maintenance is required for the LG EBR81634405 Power Control Board PCB Assembly?

Regularly inspect the control board for dust, moisture, and loose connections. Ensure the washer is unplugged before cleaning. Avoid liquid exposure and check wiring integrity periodically to prevent electrical faults or short circuits.

What are common issues with the LG EBR81634405 Power Control Board PCB Assembly?

  • Washer fails to start or respond.
  • Buttons or display unresponsive.
  • Error codes appearing randomly.
  • Intermittent operation or cycle interruptions.

Installation Steps

Step1: Disconnect washer power supply and water inlet for safety.

Step2: Remove rear panel of washer carefully.

Step3: Label and disconnect wiring harness connections.

Step4: Unscrew old board and replace with new unit.

Step5: Reconnect all wiring firmly and check alignment.

Step6: Reassemble panel and run a test cycle.