The store will not work correctly in the case when cookies are disabled.
We collect user information to provide a better user experience and protect the security of our website. By continuing to use our website, you acknowledge the use of cookies.
Observance of Independence day July 4th we are closed [No shipping's and deliveries ] on 07/03/2026, Orders received after 3.00pm CST on 07/02/2026 will be shipping out on Monday 07/06/2026
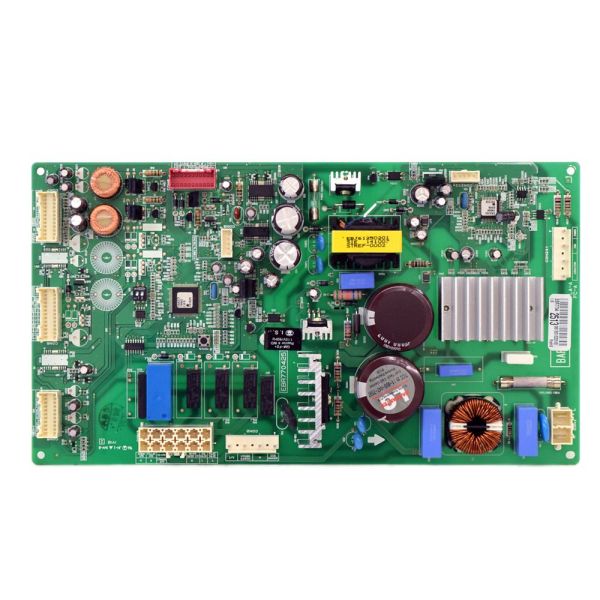
The LG EBR76519513 Dryer Electronic-Control Board PCB-Assembly helps in controlling the operations of the dryer and its functions and this accepts input signals, controls heat, regulates drying cycles, and ensures proper functioning by controlling power supply. It functions in a manner that it accepts commands from the user interface and transforms them into electrical signals that control the motor speed and heating elements among others.
What maintenance is required for the LG EBR76519513 Main PCB Assembly?
Monitor cycle selection accuracy to confirm the board processes commands correctly. Ensure wiring harnesses remain properly connected and secured. Keep the control compartment dry and ventilated, and unplug the dryer before accessing internal electronic components for maintenance.
What are common issues with the LG EBR76519513 Main PCB Assembly?
Program settings are failing to respond.
Cycle stopping unexpectedly.
Control panel operating erratically.
Drying sequence is not completing.
Installation Steps
Step1: Disconnect the dryer from the electrical outlet to ensure safety.
Step2: Remove the top or rear access panel to remove the main board area.
Step3: Carefully unplug all wire harnesses connected to the old PCB.
Step4: Release the mounting screws or clips holding the board.
Step5: Fit the new PCB into place and secure it firmly.
Step6: Reinstall the panel, restore power, and run a short cycle to verify operation.