How to Install a Samsung Dishwasher Like a Pro
Installing a new Samsung dishwasher is a worthwhile home upgrade that enhances efficiency, convenience, and kitchen value. Whether you’re replacing an outdated model or adding one to a new kitchen, following professional Samsung dishwasher installation practices ensures long-term reliability and optimal performance. A proper installation not only guarantees quiet and efficient operation but also helps maintain your manufacturer's warranty and reduces future repair costs.
This guide explains how to install Samsung dishwasher models like a professional. It covers every stage, from preparation and required tools to testing, troubleshooting, and ongoing care. You’ll also find insights into dishwasher installation cost, how to use your Samsung dishwasher, and best practices for Samsung dishwasher maintenance. Following these structured steps ensures your appliance performs flawlessly for years.
Why Proper Installation Matters for Your Samsung Dishwasher
Professional Samsung dishwasher installation ensures that your appliance functions safely and efficiently.
-
When a dishwasher isn’t installed correctly, it may cause leaks, drainage problems, or even electrical risks. Improper setup could void the manufacturer’s warranty and result in unnecessary service expenses.
-
Using a certified Dishwasher Installation Kit and approved Samsung dishwasher brackets reduces the likelihood of installation-related problems.
-
Additionally, correct electrical and plumbing connections improve the overall energy efficiency of your kitchen. Investing time in a precise Samsung dishwasher setup pays off in long-term durability, quiet performance, and energy savings.
Remember, a well-installed dishwasher means fewer repairs, less downtime, and a cleaner, more organized kitchen.
Tools and Materials You’ll Need Before Installing Samsung Dishwasher
Before starting the Samsung dishwasher installation, gather all tools and components. Having the right equipment simplifies the process and prevents delays.
Essential tools and materials:
-
Dishwasher installation kit (includes hoses, hardware, and Samsung dishwasher brackets)
-
Adjustable wrench and pliers
-
Flathead and Phillips screwdrivers
-
Power drill (optional)
-
Level for alignment
-
Teflon tape for sealing water connections
-
Samsung dishwasher replacement parts (in case any old or damaged parts need replacing)
A complete Samsung dishwasher installation kit provides compatible parts specifically designed for your model. Always double-check that all components are in the box before you start. Missing items could cause leaks or instability later on. Following the Samsung dishwasher installation instructions helps ensure each connection is tight and correctly placed.
Preparing Your Kitchen Space for Samsung Dishwasher Setup
A successful Samsung dishwasher setup starts with proper preparation. The space where you install your dishwasher must be clean, level, and fully accessible.
Steps to prepare:
-
Clear out the cabinet space beneath the countertop. Remove old debris or plumbing obstructions.
-
Turn off the water supply and electrical power to the area.
-
Measure the opening to confirm it matches your dishwasher’s dimensions.
-
Verify that your plumbing and electrical lines meet the requirements outlined in the Samsung dishwasher installation instructions.
Proper preparation ensures that your Samsung dishwasher installation process runs smoothly, minimizing the need for later adjustments. Ensuring your water, power, and drain connections are within reach, avoiding complications during installation.
Example (Real User Case):
An unlevel floor or obstructed drain line is a frequent cause of error codes like LC or LE (Leakage Error) after installation. Samsung’s official support documentation highlights that even when no visible leak is present, trapped moisture under the unit can trigger these codes.
Thorough preparation minimizes these risks and ensures a smoother Samsung dishwasher setup.
(Source: Samsung Support – Dishwasher leaking or has leakage error code)
How to Install Samsung Dishwasher: Step-by-Step Process
Understanding how to install Samsung dishwasher models correctly prevents costly rework and potential water damage. Follow these steps carefully for a professional finish.
1. Unbox and inspect the dishwasher
-
Begin by unboxing your new appliance. Check for any signs of shipping damage or missing items.
-
Verify that the Samsung dishwasher installation kit and Samsung dishwasher brackets are complete.
-
If something is missing, you can order genuine Samsung dishwasher replacement parts online before proceeding.
2. Install mounting brackets
-
Choose the appropriate Samsung dishwasher brackets depending on your countertop material: granite, laminate, or wood.
-
Attach them according to your Samsung dishwasher installation instructions. Brackets stabilize the unit and prevent movement during operation.
3. Prepare the water line and electrical connection
-
Wrap Teflon tape around the threads of your water inlet to prevent leaks. Attach the water line from the dishwasher installation kit to the dishwasher’s inlet valve.
-
For power, either plug the unit into an outlet or hardwire it, depending on your model. Always disconnect power before wiring for safety.
4. Attach the drain hose
-
Secure the drain hose to your sink drain or garbage disposal. A high loop should be created in the hose to prevent backflow. Use the included clamp from the Samsung dishwasher installation kit
-
Following the Samsung dishwasher installation instructions for hose placement helps ensure smooth drainage and no water pooling.
5. Slide the dishwasher into place
-
Carefully position the dishwasher into the cabinet opening. Check that hoses and wires aren’t kinked or trapped. Use a level to confirm that your unit sits evenly.
-
Proper leveling is critical to the Samsung dishwasher setup, ensuring quiet operation and even water distribution.
6. Secure and test connections
-
Once the dishwasher is in place, use your Samsung dishwasher brackets to secure it to the countertop or sides. Reconnect the power and water, then inspect for leaks.
-
Run a short test cycle to confirm everything functions correctly. Refer to your Samsung dishwasher installation instructions if you encounter any irregularities during testing.
This precise process minimizes issues and ensures long-term reliability. If any part feels unstable or leaks occur, recheck your fittings or replace defective parts with genuine Samsung dishwasher replacement parts.
Example (Real Case):
A user on Reddit reported that their brand-new Samsung dishwasher door wouldn’t open fully after installation, the door would pop up slightly, preventing the bottom rack from sliding out. Samsung confirmed this was an installation issue caused by improper leveling or bracket alignment.
(Source: Reddit - Brand new Samsung dishwasher doesn’t stay open fully)
Samsung Dishwasher Installation Costs: DIY vs. Professional
The total dishwasher installation cost depends on whether you handle the process yourself or hire a professional.
|
Installation Type |
Approximate Cost (USD) |
Details |
|
DIY (Using Dishwasher Installation Kit) |
$50–$150 |
|
|
Professional Install |
$200–$500 |
|
|
Samsung dishwasher brackets |
$20–$40 |
|
|
Samsung dishwasher replacement parts |
$10–$100 |
|
Professional installation is advisable for complex setups involving hardwiring, plumbing rerouting, or integrated cabinetry. DIY installation is suitable if you have basic home repair skills and follow Samsung dishwasher installation instructions carefully. Regardless of approach, always verify that your setup meets local building codes.
Explore: How Much Does It Cost to Install a Dishwasher
Testing Your Samsung Dishwasher for the First Time
Once your Samsung dishwasher installation is complete, running an initial test ensures the system is functioning properly before full use.
Steps to test:
-
Keep the dishwasher empty during the first test.
-
Run a quick wash cycle of 15–30 minutes.
-
Inspect around the base, door, and connections for leaks.
-
Check that the water drains properly into the sink or disposal.
-
Listen for unusual noises, which could indicate improper leveling.
If any leaks occur, tighten fittings or check the hoses as per Samsung dishwasher installation instructions. Testing helps you identify minor issues before regular operation begins, saving you on potential service calls and avoiding water damage.
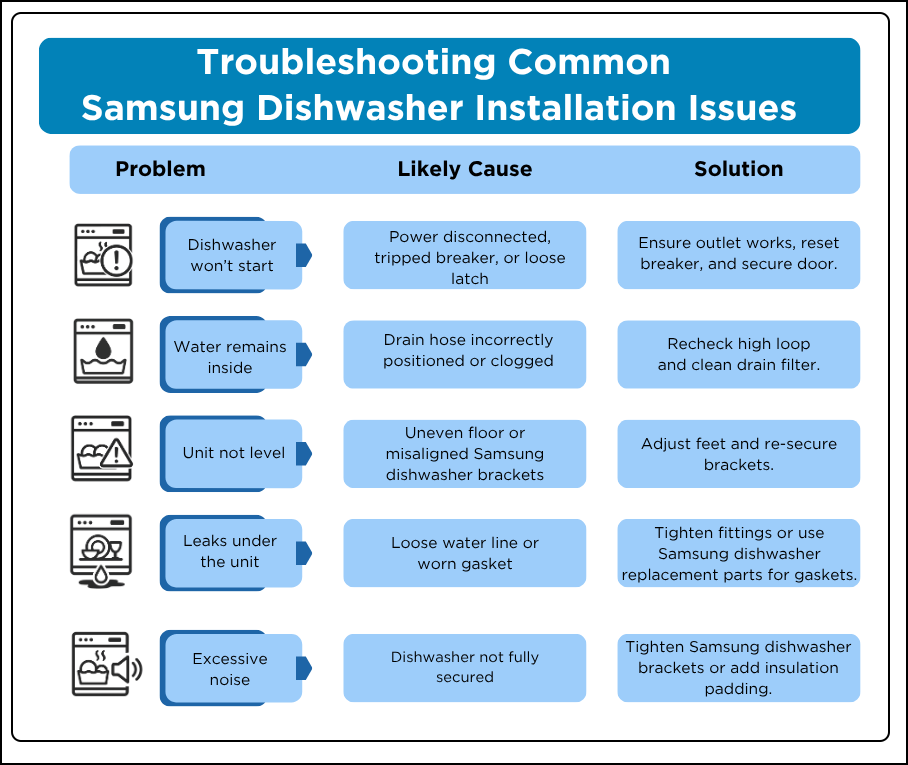
Troubleshooting Common Samsung Dishwasher Installation Issues
Even with a proper Samsung dishwasher setup, small issues can appear. Fortunately, most problems are easy to fix with basic tools and understanding.
Example (Real User Case):
A verified user on the Samsung U.S. Community Forum reported that their DW80K5050US Samsung dishwasher intermittently stopped draining after each cycle, despite clearing debris and checking the pump. The root cause was traced to the drain hose being pinched underneath the dishwasher during installation, a common oversight that restricts water flow.
This real scenario underscores why the Samsung dishwasher setup must be done carefully with proper clearance behind the appliance.
(Source: Samsung Community – Dishwasher intermittently not draining DW80K5050US)
How to Use Samsung Dishwasher After Installation
Understanding how to use Samsung dishwasher models effectively ensures optimal cleaning and longevity.
Operating tips:
-
Load dishes with space between them to allow free water flow.
-
Use dishwasher detergent designed for high-efficiency systems.
-
Choose the appropriate cycle based on the soil level.
-
Avoid overloading racks, which can block spray arms.
-
Clean filters and run a self-clean cycle regularly.
Proper use not only extends appliance life but also maintains the energy efficiency your Samsung dishwasher installation was designed to deliver.
Samsung Dishwasher Maintenance Tips for Long-Lasting Performance
Routine Samsung dishwasher maintenance prevents performance decline and extends the appliance’s lifespan. Following the schedule in your Samsung dishwasher installation instructions keeps internal components running efficiently.
Maintenance checklist:
-
Monthly: Clean filters to prevent food residue buildup.
-
Quarterly: Inspect spray arms and remove mineral deposits.
-
Biannually: Check seals, hoses, and fittings for signs of wear. Replace using genuine Samsung dishwasher replacement parts when necessary.
-
Annually: Verify that your Samsung dishwasher brackets remain tight and the unit stays level.
For optimal results, always use recommended detergents and refer to your user manual for how to use Samsung dishwasher cleaning features. Proper Samsung dishwasher maintenance helps avoid recurring repair costs, ensuring your unit operates smoothly year-round.
9 Easy Steps: To Clean a Dishwasher Quickly
Summary: Keep Your Samsung Dishwasher Long-Lasting
Installing a Samsung dishwasher doesn’t have to be complicated when you approach it with proper preparation and attention to detail. By using the right tools, following the official installation guide, and ensuring all components are securely fitted, you can achieve a professional-quality setup that delivers years of reliable performance.
Key points to remember:
-
Gather a complete installation kit before starting to avoid missing parts.
-
Ensure plumbing and electrical connections meet all safety standards.
-
Use the correct mounting brackets for stability and secure placement.
-
Follow Samsung’s official installation instructions step-by-step.
-
Replace any damaged or worn components only with genuine Samsung parts.
-
Learn to use dishwasher settings efficiently for better cleaning results.
-
Conduct regular maintenance to extend the appliance’s lifespan.
-
Evaluate the installation cost; DIY can save money, but professional help is best for complex setups.
By following these essential steps, you’ll ensure your Samsung dishwasher operates smoothly, delivering spotless dishes and dependable performance for years to come. Hnk Parts is your go-to source for dishwasher parts. Whether you need hoses, pumps, or filters, we carry everything from top brands like LG, Midea, and Bosch to keep your dishwasher running smoothly. Browse our selection today for authentic Samsung replacements and reliable parts performance.
FAQs
Does the Samsung dishwasher come with a mounting bracket?
Yes, most Samsung dishwasher models come with a mounting bracket for secure installation under the countertop.
What is the black rubber flap under the door on my Samsung dishwasher?
The black rubber flap under the door on your Samsung dishwasher is a door seal or splash guard. It prevents water from leaking out during wash cycles.
What is the most common leak in a Samsung dishwasher?
The most common leak in a Samsung dishwasher comes from a damaged door gasket or worn-out water inlet valve, causing water to escape from the door area or the bottom.
-
 Samsung DD33-01001A Dishwasher Water ValveSpecial Price $94.80 Regular Price $119.00
 -
 Samsung DD82-01102B Dishwasher Dishwasher Access PanelSpecial Price $50.10 Regular Price $52.71
 -
 Samsung DD82-01121A Dishwasher Rack Adjuster AssemblySpecial Price $60.00 Regular Price $76.95