Whirlpool 4396006RW Dryer 4" Aluminum Vent Elbow

Special Price $12.08 Regular Price $13.38
In stock
Available Quantity:   119
SKU
4396006RW

Product Description

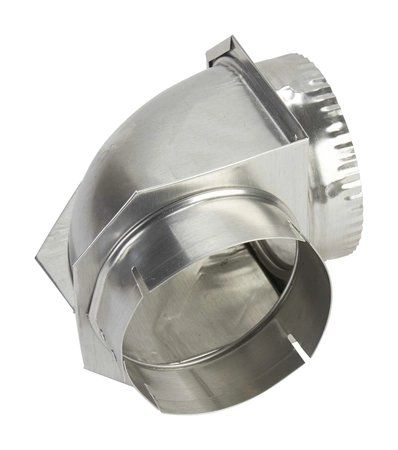
The Whirlpool 4396006RW dryer vent elbow is a lifesaver in small laundry spaces. Even with only approximately 4.5 inches of clearance behind your machine, you may attach your dryer vent pipe with the help of this small aluminum elbow. It has a 90-degree bend and rotatable collar snap-lock fittings offer a reliable and flexible connection. There's no need to disassemble your dryer or be an expert; installation is straightforward. Although many dryer brands are compatible with this universal design, always confirm that it will work with your particular model before making a purchase. This elbow makes it possible to install your dryer in a secure manner in even the tightest laundry rooms by reducing the amount of space required behind your dryer.

Manufacturer
✓ This Product Replaces: 4396006, 10131
https://www.hnkparts.com/media/catalog/product/4/3/4396006rw-83633.jpg

This Part Fits the Following Models (86)

Maytag MGD7230HW0 Dryer Maytag MED7230HC0 Dryer Maytag MGD6230HC0 Dryer Maytag MGD6230HW0 Dryer Maytag MED6230HC1 Dryer Maytag MED6230RHW0 Dryer Whirlpool WED5100HW3 Laundry Center Whirlpool YWED5100HW3 Laundry Center Whirlpool YWED5100HW2 Dryer Whirlpool WED5100HW2 Dryer Whirlpool WED8127LW1 Dryer Whirlpool WED6120HC3 Laundry Center Whirlpool WED6120HW3 Laundry Center Whirlpool WED6120HW2 Dryer Whirlpool WED7120HC3 Laundry Center
Showing 1-15 of 86
Manufacturer Name: WHIRLPOOL
Product Number: 4396006RW
OEM Part Number: 4396006RW
Product Description: 4" Close Alum Vent Elbow

Choose the best Home Appliance parts and supplies from HnKParts!

  • Same Day Shipping

  • Best Quality And Best Price

  • Wide Range of Inventory

  • Best Customer Service

Have More Questions or Need Help to Place The Order?
Reach us at (866)723-0907 or [email protected]

Write Your Own Review
You're reviewing:Whirlpool 4396006RW Dryer 4" Aluminum Vent Elbow
Your Rating
Customer Questions
No Questions

Installation Steps

Step 1: The dryer is disconnected from the power source and any gas lines linked to it are shut off.

Step 2: The dryer is shifted away from the wall and the vent duct is extracted from the wall.

Step 3: The clamps or screws securing the old elbow are loosened and it is detached.

Step 4: The new vent elbow is positioned correctly and it is fastened using the existing screws or clamps.

Step 5: The new elbow is joined to the vent duct and it is secured with tape or suitable connectors.

Step 6: The dryer is reconnected to the power supply and the power is switched back on to verify proper functionality.

Please note that these instructions are served as general guidance and should always be utilized alongside the manufacturer's manual, if accessible.