Whirlpool 4392067 Dryer Maintenance Kit

Special Price $22.13 Regular Price $47.83
In stock
Available Quantity:   1056
SKU
4392067

Product Description

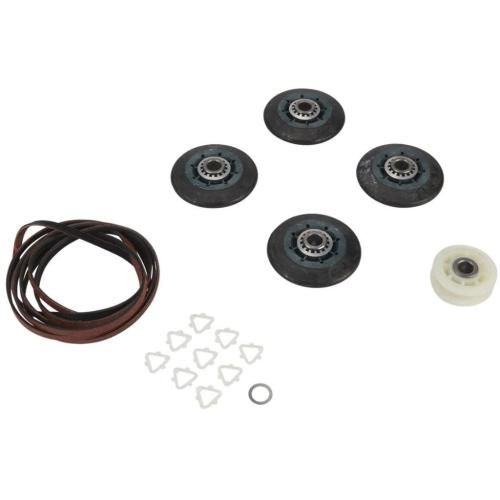
Whirlpool 4392067 Dryer Maintenance Kit designed to bring back efficiency by replacing parts that degrade with use. It has a drum belt, support rollers, idler pulley, and hardware to facilitate the rotation of the drum. The belt is tensioned to ensures optimal tumbling, while roller and pulley minimize friction and noise. This kit is easy to install and improve the drying capacity, reduce noise during operation and increase the durability of the appliance.
9.7"X14.05"X0.85"
Manufacturer
✓ This Product Replaces: 4392067RC, 80047, 4392067VP, DE2067
https://www.hnkparts.com/media/catalog/product/4/3/4392067_WHIRLPOOL_1.jpg

This Part Fits the Following Models (1088)

Whirlpool Residential WED7540FW0 WED7540FW0 Whirlpool WED9550WL0 Dryer Whirlpool WGD5100HC2 Dryer Whirlpool WED9500TU1 Dryer Whirlpool WED9500TW0 Dryer Whirlpool WED9500TW1 Dryer Whirlpool WED9500TW2 Dryer Whirlpool WED9500TW3 Dryer Whirlpool WGD9151YW0 Dryer Whirlpool WGD9151YW1 Dryer Whirlpool WGD9200SQ0 Dryer Whirlpool WGD9200SQ1 Dryer Whirlpool WGD92HEFBD0 Dryer Whirlpool WGD92HEFU0 Dryer Whirlpool WGD92HEFW0 Dryer
Showing 1-15 of 1088
NON-Wiseable. This repair kit is for dryers. Dryer repair kit 4392067 includes the parts most frequently replaced due to normal wear and tear. The kit may include multiple parts; refer to your parts diagram for a complete list of parts included.Follow the instructions included in the repair kit when installing these parts. Wear work gloves to protect your hands.
Write Your Own Review
You're reviewing:Whirlpool 4392067 Dryer Maintenance Kit
Your Rating
Customer Questions
No Questions

Installation Steps

Step 1: The dryer is disconnected from the electrical outlet and the circuit breaker is deactivated.

Step 2: The dryer door is opened, then the two screws securing the lint filter are taken out.

Step 3: The lint filter is slid outwards and the two electrical connectors located behind the filter are detached.

Step 4: The dryer is gently moved away from the wall, ensuring that any loose wires or hoses that might still be attached are checked.

Step 5: The screws fastening the top panel to the dryer are extracted with a Phillips head screwdriver.

Step 6: The top panel of the dryer is carefully elevated, ensuring that no wires or components underneath are harmed.

Step 7: The high-temp switch and thermal fuse are unplugged from the dryer.

Step 8: The old dryer repair kit is removed, ensuring that the new one is on hand.

Step 9: The new dryer repair kit is fitted, ensuring that the high-temp switch and thermal fuse are connected properly.

Step 10: The top panel is reattached and the two electrical connectors to the lint filter are reconnected.

Step 11: The lint filter is reinserted and fastened with the two screws.

Step 12: The plug is reconnected to the wall and the circuit breaker is turned back on.

Step 13: The dryer is operated to verify that it is functioning correctly.

Please note that these instructions are served as general guidance and should always be utilized alongside the manufacturer's manual, if one is available.