The store will not work correctly in the case when cookies are disabled.
JavaScript seems to be disabled in your browser.
For the best experience on our site, be sure to turn on Javascript in your browser.
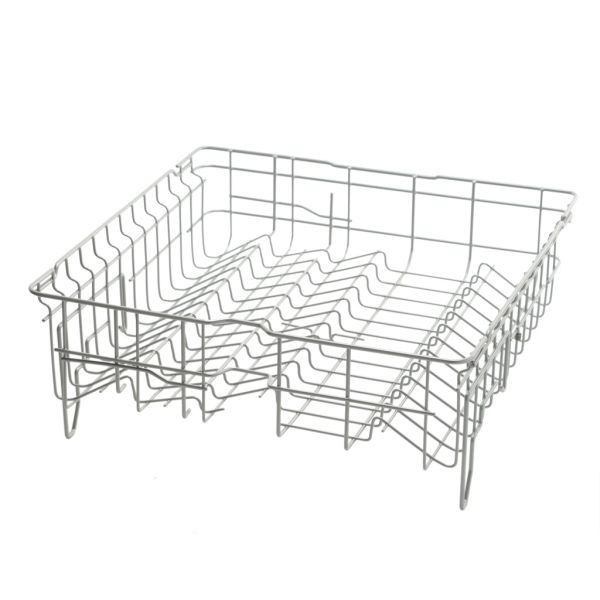
LG 3750ED1005D Dishwasher Rack Assembly
Special Price
$204.24
Regular Price
$261.68
Out of stock
Available Quantity:
0
Product Description
The LG 3750ED1005D Dishwasher Rack Assembly is fitted in the lower section to support dishes, pots and pans safely during the washing process to enable them to be placed stably and cleaned effectively. It is used as a support framework that glides in and out on the rails of the dishwasher to make loading and unloading easy. The rack is constructed of a sturdy metal frame and covered with a high-quality protective finish to ensure that water jets can reach every surface of the dishes.
https://www.hnkparts.com/media/catalog/product/3/7/3750ed1005d_lge_hnkparts.png
Manufacturer Name: LGE Product Number: 3750ED1005DOEM Part Number: 3750ED1005DProduct Description: Rack Assy
Choose the best Home Appliance parts and supplies from HnKParts ! Have More Questions or Need Help to Place The Order?(866)723-0907 or [email protected]
Installation Steps
Step 1: The dryer should be disconnected from the power source. The gas and water connections should be shut off as needed.Step 2: The screws and metal clips securing the front panel of the dryer to the back panel should be taken out.Step 3: The door should be opened and the lint filter along with the lint guard should be extracted.Step 4: The wiring harnesses linked to the drum and the control panel should be unplugged.Step 5: The fasteners holding the drum to the rear panel should be unscrewed. The drum should be gently lifted out of the cabinet and placed aside.Step 6: The old drum support spacer, which is attached to the cabinet by two screws, should be identified.Step 7: The old spacer should be detached and the new one (3750ED1005D) should be installed. It should be fastened with the screws.Step 8: The dryer should be reassembled by reversing the disassembly steps.Step 9: The dryer should be reconnected to the wall outlet, the gas and water lines should be restored, and its proper functioning should be verified.