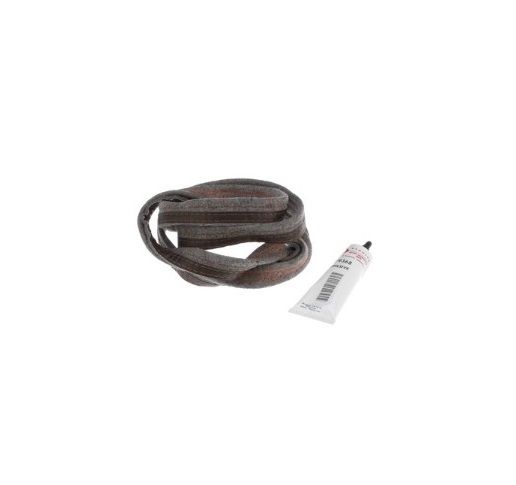
This Part Fits the Following Models (1089)
Whirlpool Dryer Felt Seal 280114
The Whirlpool Dryer Felt Seal 280114 is a crucial part used to keep your dryer operating at peak efficiency and performance. By securely sealing the drum to the front panel, this original Whirlpool component keeps hot air and lint from escaping throughout the drying cycle. The felt seal maximizes the dryer's performance by forming a safe barrier that keeps out air and guards against future harm to nearby components. The felt seal is made to survive because of its precise engineering and long-lasting materials, which should enable it to withstand daily demands. Because of its robust design, it can endure the heat and friction produced during the drying process, providing dependable and constant performance during each cycle. The Whirlpool 280114 Dryer Felt Seal's user-friendly design and easy installation instructions make it simple to install. You may quickly and simply replace the worn or broken felt seal, restoring the efficacy and efficiency of your dryer, with very little work and minimal tools. With the Whirlpool Dryer Felt Seal 280114, you can modify your dryer and be secure that it's performing at its peak. Enjoy dryer cycles that are more efficient and seamless, with fewer problems and interruptions. You can rely on Whirlpool's dedication to quality and innovation to meet all of your laundry demands and make your home a more hygienic and comfortable place for you and your family.
Key Features for the Whirlpool Dryer Felt Seal 280114:
-
Genuine Whirlpool Part: Ensures compatibility and reliability.
-
Effective Sealing: Prevents hot air and lint from escaping during the drying cycle.
-
Durable Material: Made with premium materials for enduring durability.
-
Proper Airflow: Keeps the dryer's internal airflow at its ideal level for best results.
-
Easy Installation: Design that is easy to use for simple replacement.
-
Universal Fit: Ideal for a large variety of Whirlpool dryer types.
Installation Steps
Step 2: The lint filter cover is taken off and subsequently the lint filter is extracted.
Step 3: The four screws that secure the top panel are unscrewed and the top panel is carefully lifted away.
Step 4: The wiring harnesses are detached from both sides of the drum and then the drum is removed.
Step 5: The components of the current drum seal, including the felt, adhesive, and clips, are extracted.
Step 6: Any dirt or debris is eliminated from the frame edges and the location where the drum seal will be fitted.
Step 7: The new drum seal is positioned correctly and fixed in place using adhesive and clips.
Step 8: The drum is reinserted and the wiring harnesses are reconnected.
Step 9: The lint filter and the lint filter cover are reattached.
Step 10: The top panel is replaced and secured with the fastening screws.
Step 11: The Whirlpool dryer is reconnected to its original electrical outlet.
Step 12: Several test cycles are performed to verify that the drum seal is installed correctly.
Please note, these instructions are served as general guidance and should always be utilized alongside the manufacturer's manual, if it exists.
