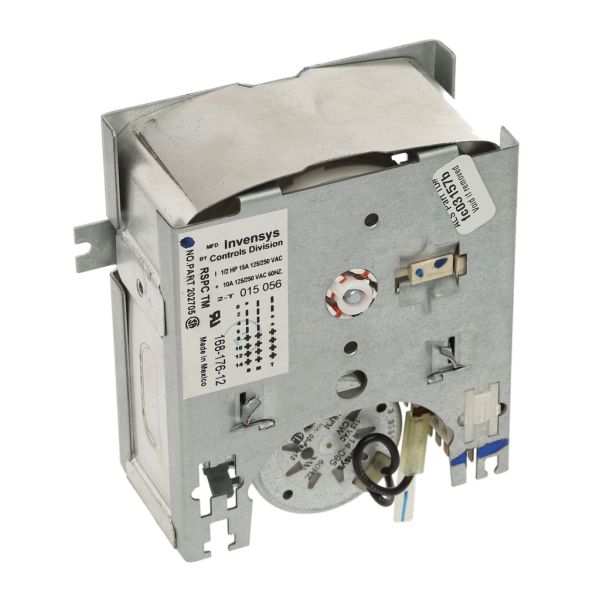
The Speed Queen 202705P Washer Timer is an effective and durable part of a washing machine that is used to control the washing time. This is a 120V, 60Hz washing timer that enables the users to choose four different washing cycles for their clothes. It controls the time of each wash phase to allow the proper functioning of the machine and its efficient operation.
Step 1: Prior to starting, it should ensure that the power to the Washer is switched off at the circuit breaker for safety.
Step 2: The back panel of the machine should be detached using a Phillips-head screwdriver and set aside.
Step 3: The timer knob located on the upper section of the control panel should be identified. It is typically marked as “timer.”
Step 4: The timer knob should be removed and placed aside.
Step 5: A small screwdriver should be utilized to take out the screws securing the old timer. The old timer should be carefully extracted from the washer.
Step 6: The new 202705P Speed Queen Washer Timer, 120V/60HZ 4 Cycle should be inserted into the same location where the old timer was removed. It should ensure that it fits tightly and securely.
Step 7: The screws that were taken out in Step 5 should be reinserted into the timer to fasten it correctly.
Step 8: The timer knob that was removed in Step 3 should be reattached.
Step 9: The back panel should be repositioned onto the washer and secured using the screws that were removed in Step 2.
Step 10: Power should be restored at the circuit breaker and the functionality of the new timer should be verified to confirm it is operating correctly.
Please be aware that these instructions serve as general guidance and should always be utilized alongside the manufacturer's manual, if available.